
Adding your first tour to XMS Systems Tour Manager Module
With your basic configuration done its time to start with the fun bit. Defining your first tour.
Adding your first tour might seem like a nightmare at first glance. But let's look at it and get your first tour configured.
Login it and go Admin > Site Dashboard > Tours > Tours Management

Two things that is worth a mention on this page is the "Seen" figure. That is the total number of times your tour has been "seen" by your site visitors. The “calendar” icon under the heading “Sch/Cust” shows the tour is a scheduled tour, The “round red” icon indicates the tour is listed on the custom tour page.
The orange button with the facebook icon on it allows you to post this tour to your facebook page. The number is the total number of times it has been posted. The button will only be visible your facebook integration is done and working. Inactive tours will have a greyed out facebook button to stop you from posting an inactive tour to facebook.
The “Per Person” and “S Supp” values displayed are the first set we found in your pricing blocks and not necessarily valid prices.
In the latest version, we added a “google+” button as well to allow you to easily post your tour to your company google plus page. It is a bit “rough around the edges” but functional.
This has been removed because google+ has died a rather sudden death in early 2019.
To re-order any of your tours, click the green or blue “up” and “down” buttons to move them the order you want them displayed on your list. Remember to click “save” at the top of the page, above the arrows to save the new order.
Click "add new" at the bottom or "edit" to edit a specific tour.
Basic Information

- Category
the tour belongs to. (Define your categories here) - Scheduled Trip
Select this to “Yes” if this tour is available as a scheduled tour - Departure Schedule
Select the Calendar option from the Schedule dropdown that corresponds with this scheduled tour (only applicable to tours that have a fixed scheduled departure) (Set up your schedules here) - Descriptor
The value you enter here will be used on the front end to denotes Single day Tour or Multi-day Tour. If you change the value to MTB Experience, the information on the front end will be displayed as Single Day MTB Experience or Multi-Day MTB Experience.- Pages affected would be the listing in the category page
- Similar tours at the bottom of the tour details page
- The booking request page
- Trip Type
Select "Yes" if the tour is longer than 1 day. i.e. you going to sleep over somewhere. i.e. Multi-day - Single Day Bookings
Select the appropriate “extra” schedule from the dropdown. A secondary effect to this is that a calendar will be displayed on the tour details page showing the booked days. (Define your extra calendar items here) - Available
Makes the tour available on your website front-end. Set this to “No” to hide it in all instances. - Viewed
The number of times this tour has been displayed. This is just an indication of how many times the tour/page has been loaded. For a more accurate reflection refer to your google analytics. - “No Fixed Departure Dates”
Set this option to “No” to hide the “No Fixed Departure Dates” note on the tours that does not have any scheduled departures. This will hopefully get your site visitors to be a “walk-in” client. - Featured
Set this to “Yes” to display this tour on the home page if the option on the home page is enabled. - Featured Heading Word
You can replace/change the word “Popular” that is displayed when the tour is set as “Featured” and the next option is set to yes. - Show Featured Heading
This option will show or hide the overlay on the tour if item 10 is set to yes to mark the tour as “Featured” - Show the “Info” column
By default, the XMS Systems Tour Manager allows you to display important information in a column on the right side of the page. This can be disabled if not needed by setting this option to “No”. - Show Prices Block
In some cases, you would have no reason to display prices per tour for whatever reason. In those cases, you might choose to not display the “Prices” block at all. - Download PDF
Set this to “Yes” to allow your visitor and potential client to download a pdf file of this tour. These PDF files are generated from scratch automatically every time the button is clicked on the tour page.
Alternate Language URL’s

In the latest version, currently under development, you can add alternate links to the specific tour as it is displayed on the relevant website.
You need to enter a fully qualified URL, exactly as it is on the multilingual website as well as selecting the language the website is in.
Custom Tour Settings

- Include as Custom
Set this option to “Yes” to have this tour listed in the “Custom Tours” form to allow your client to select as many tour options as they wish. This would typically be used to allow your client to build their own “custom” tour based on your available options. - Custom Tour Groups
Select any or as many groups this tour belongs to. See the article on XMS Tour Manager Configuration for information on defining your custom groups.
The custom tours will be displayed on the “Custom Tour” page. Read more here about the “Custom Tour Page” and how it works.
Basic Tour Information

- Tour Title
Use a nice descriptive title for the tour. This also serves as the name of the page (URL) the tour will be displayed on. Try not to change the name once the tour is active to avoid the search engines from having to re-index it again. You can change the name to experiment with different keywords if the tour doesn’t do well in the search engine result pages. Keep in mind it can take some time for the search engines to re-index your page with the new name.
If you do change the name, you don’t have to do anything as the page will automatically redirect to the correct page if a visitor clicks a link somewhere that points to the old URL - Grading
is the overall difficulty of the tour - Country, County
These fields will be used at a later stage to allow the visitor to search/filter by these parameters if you have 100’s of tours on your website - City
This field is already in use and displayed on the “Custom Tours Page” as part of the tour title. - Tour Image
Upload an image to represent this specific tour. This will be displayed on the “tour list page” as well as to generate Twitter, Facebook and Google+ cards when anyone shares the tour to one of these social networks. Ideally, the image should be ± 800 pixels wide. - Access Level
Should normally be set to "Visitor - Not logged in" for maximum exposure. You can, however, use this to promote the tour to logged in users only. Let's say, to "Tour Agencies" - Visible if Not logged in.
This is an extension of the “Access Level” setting. Set this to "no" to show to anyone as long as they are logged in. Set to "Yes" by default.
Action button to start booking request

- Action Button.
This is the “wording” used on the button the visitor will click to go to the bookings page. You can use this to specify a "Book Now" or "Enquire" or whatever you fancy. - Custom Link Active
Set this to “Yes” to use the Custom Action Link for this tour. If you need to temporarily disable the link, just set this to “No”. There is no need to delete the URL. - Custom Action Button
If you need to redirect the client to a different page than the usual booking/enquiry page you can add the URL in this field. This is useful if you want to use something like “Activity Bridge” to manage your bookings for you. There is nothing stopping you to use your own “/contact_us.php” page for the action link - Target Window
Set this to “Open New Tab/Window” if the URL you enter in the “Custom Action Link” is on a different website than yours. - Custom Itinerary Button
You can change/replace the text used on the Custom Itinerary button. As usual, keep it short and sweet. - Custom Itinerary Button
Set this option to “Yes” to display the “Custom Itinerary” button on the tour.
This will link to a page where the site visitor can select additional options to expand the itinerary. - Display Buttons
Here you have the option to either display the “Normal” or “Custom” action button combined with the “Custom Itinerary” button if enabled or display only the “Custom Itinerary” button.
Rental Options
- Equipment for rent
Set to “Yes” if you have specific equipment that is required for this tour that your client might want to rent from you. This option is displayed on the bookings page with a field where the client can specify the number - For Rent Item
Enter the “name” of the equipment you have for rent. This is set to “Bike” by default but could be “MTB Bike” or “Road Bike” or might even be “Ponies”. This information is displayed on the bookings page with a field where the client can specify the number of items they need to rent. A message will be displayed below the field stating that additional costs will be added as applicable.
Tour Summary
is displayed in the list of tours per category page as well as what is posted to Facebook, Twitter and Google. So make sure it summarises the tour in only a few lines
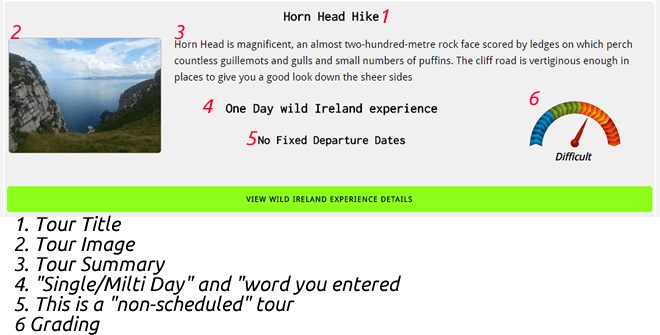
Up to this point in the process, your tour will look like the image below on the “Category” and “All Tours” pages.
Tour Detail
This is where you are going to “sell” your tour so take your time and think about what you are going to say
- Overview.
Looking at your actual tour page this is the text just below the main image. A short and accurate concise but informative overview of the tour. There is no limit to the text/information you can add in this section. - Tour Content.
This is where you going to define the tour itinerary or what you going to do on the tour, places you are going to visit. Basically a more complete breakdown of your tour.
Formatting/Layout requirements you need to be aware of to make sure everything looks the same and consistent across all your tours.
Keep in mind that the way things look and react, font sizes and colours can all be changed within limits of what is acceptable practice on the internet.- There is no need to start with a template. The tours page will automatically add a basic 12 column wide template if you don't.
- Start each section with a heading. You can apply any heading tag. XMS Tours Module will automatically apply the correct tag when displaying.
- followed by a paragraph
- Make sure relevant content is kept in the same paragraph by pressing SHIFT+ENTER to get a new line
- At the end of the section press ENTER
- Begin your next section with step b above
- Keep going till you covered as much detail of the tour as you want. The more information you enter here the better the possibility that the client will click your action button and make a booking.
Your content should look something like this:

Tour Images

You have the option to link a Facebook image gallery to this tour if your website integrates with Facebook
Click the orange button if you need to create a gallery on Facebook and move the photos to the appropriate Facebook gallery.
XMS Systems Facebook integration now supports as many albums as Facebook can throw at it.
If you do not have a Facebook account synced with your website you can;
- Upload up to 11 photos. Make sure to add the "Photo Description"
- To replace an image, simply upload a new image in the old position and it will be deleted when you save/update the tour
- To delete an image, click the tick-box to the right of the image and it will be deleted when you save/update the tour
Tour Group Details and Costing
Superceded by “Manage Tour Costing”
Additional rental items you might have
Superceded by “Manage Tour Costing”
Tour Special Info
- Looking at the video below, the block to the right of the summary image is a “Tour Special Info” block. You can add as many as you want to lift out important information or a short overview of the tour. Click the black button to manage your special info blocks for this tour.
These might include the following examples. Each in a separate box for clarity and with the appropriate heading. You can grade each block, hide or display any block and reorder them. - This is displayed in the “Info Column” briefly discussed in the “Basic Information” above.
- Examples of possible “types” of info you might want to add.
- Number of days for the tour if it is a multi-day tour
- Difficult grading and why you give it that specific grading
- A short summary of the route (and grading if you wish)
- Distances covered on average per day
- The terrain you going to cycle
- Special clothing suggestions
- Food and supplement suggestions
- What the tour price include and what not
Tour Costing
The tour costing functionality allows you to define prices based on group sizes and prices for multiple years.
For detailed information see the “Pricing logic used for XMS Tour Module” article
Tour Map.
Use this space to add a map from somewhere on the internet. It could be from Google Maps as an example.
When all is done your tour will look something like this on different devices:
How do I check if the layout suits all Internet enabled devices?
Check your website layout on different devices here. (Use this if your website has an SSL certificate installed.
If you do not have an SSL installed, you can check your layout here