
Adding Stock Items to XMS Systems e-commerce module
Adding Stock items to your Shop
Admin >> Dashboard >> Shopping >> Shopping Items

- SKU
This is a unique number / code you specify per stock item - Category
The category the item is allocated to - Name
The name of the stock item - Price
The price of the stock item in your default currency
Price calculations for any other active exchange rates are done "on the fly" - Offer
Show if the item is on offer (See Items on Offer Article) - Qty
The quantity you have in stock. - Visible
If the stock item is available on the shop front - Image
The first image of the stock item - Order
Change the order of your stock items in the shop - “edit” button
Click this to edit the item - “options” button
click this to edit the options of the item - “facebook” button
Click this to post a link, summary and image to your integrated Facebook page (if you have one and integration is active)
"Edit" or "Add" a stock Item
- General Information

- Category
Select the Category the item belongs to. Sub Categories is suffixed with "Child Category of XX"
Do not allocate stock items to Both the "Parent" and "Sub Categories". - Manufacturer
Select the Manufacturer of this product
If you select a Manufacturer all the products belonging the selected manufacturer will be grouped together on the "Manufacturers list" - SKU Number
A unique "Stock Keeping Unit" number / code you define for this stock item.
This will usually correspond with the stock code in your accounting system or Supplier - Name
Name the item - Product on Offer
If set to "Yes" this item will be available in the discount nugget.
If you defined this item as discounted the discounted price will show.
Items defined as "Discounted" will show as "On Offer" regardless of this setting. - Type of Offer
Select from the drop-down what type of offer this is. (See Items on Offer Article) - Price
Your asking price in the default currency. Prices for different exchange rates are calculated on the fly.
This price will also be your minimum price without any options added.
The additional costs are added via the "Options" button
In the case of a “free” digital product (0.00) it will be available for download directly after checkout.
Enter 0 to make the prices available on POR (Price On Request) - Tax Type
Select from the drop-down how this item is taxed. (Under Development) - Visible
Is the item available for sale in the shop - Product Visible to
Select who can see the product based on login level.
If you select “Restricted Member”, everyone with an access level higher than that will be able to see it. - Prices Available to
Select who can see the price based on login level.
If you select “Restricted Member”, everyone with an access level higher than that will be able to see it.
Digital Products
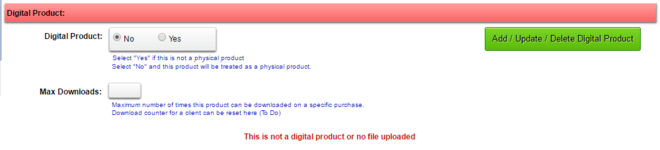
- Select if this is a digital product
- If it is a digital product, you can upload the product via the green button. Make sure to save your work before you click the upload button.
- Max Downloads defines the number of time a client can download the product after purchase. When the client reaches the maximum download number their download link will be deactivated.
Physical Products
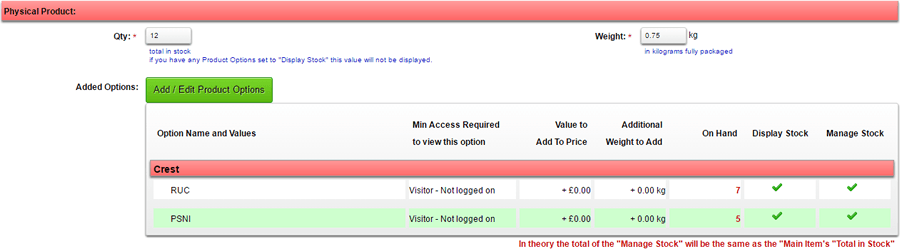
- Qty
The total number of stock on hand. If you have “Added Options” the stock levels are manages under the “Added Options” button - Weight
This would be the total packaged weight per item. This is used for calculating the shipping. If you have “Added Options” the total weight will be this value plus the added weight defined in the “Added Option” - Added Options
This is a list of options the visitor can choose from when adding the item to the Shopping Cart
Click the green button to add or edit your options.
See Defining Options Article to define and configure the options
Product Description

- Enter your product description.
Be as detailed as possible. You do not need to select a template unless you want a specific layout. - Primary Image
You need at least the “Primary Image”. This image will not only be displayed on your website but also used when posting the stock item to your Facebook Page. It is also used in the “Micro Data” read and indexed by the search engines. - Image 2 – 6
You can upload 5 additional images of your product
Associated Products
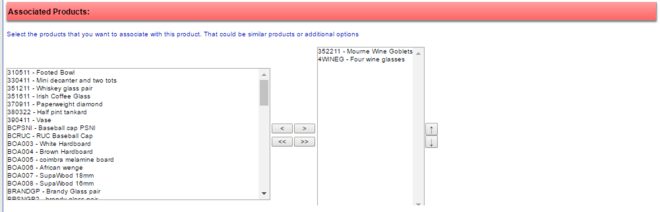
We added the option to list additional products that are associated with this item when the visitor browse the detail product information.
Use this if there are any products that the visitor might want to buy additional to the product they are looking at.
The list on the left of the screen is a complete list of all your stock items.
The list on the right is a complete list of associated items.
Highlight the item in the left or hold the CTRL button to select more than one item then click the top right arrow to add to the associated list.
Click the Double right arrow to add all the items at once.
Downloadable File
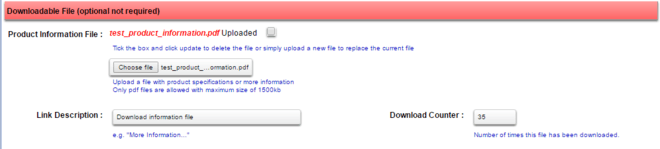
- Product Information File
This gives you the functionality to make available a pdf file your visitors can download and print if required.
The use of this feature is optional but could prove handy if you sell products that has a long list of specifications or you want a branded brochure for the product.
Click "Browse" to upload a file.
Tick the box and update to delete the fil - Link Description
Define the description of the link leading to the pdf file. As an example you can use "More Information..." - Download Counter
The total times the file has been downloaded. You can reset this at any time by simply changing the value to 0 or what ever you want.
Below is what your shop should look like.
