Using the XMS Systems WYSIWYG editor

Using the XMS Systems WYSIWYG editor

Introduction to using the Content editor in cluding a discussion on the buttons and functions available

This Article is in the process of getting updated.

The XMS Systems WYSIWYG editor is used to edit your page content and write articles and most text fields in some shape or form. There is not much difference between using a normal text editor in your favourite email client or your word processor.

Things are done a bit differently to make sure the content you are entering is formatted for the internet and will look the way you intended, hopefully, on all the different browsers that are available for use in the modern internet.

The problem is that all browsers interpret the web standards differently with the result that things looks different in all of them. For those that are interested in finding out more about web browsers click here

The editor has been tested on the following browsers:

  1. Google Chrome
  2. Firefox
  3. Internet Explorer / Edge
  4. Safari

Personally I would suggest you download and use Google Chrome Chrome as your internet Web Browser.

The WYSIWYG (What You See Is What You Get) editor we are using in XMS Systems are the CKEditor. It has been chosen for it’s wide browser compatibility, flexibility and ease of use.

Editor Overview

There are 5 different areas to the editor

  1. Tool bars (Two rows)
    Use any of the buttons to insert or change the appearance of your content.
    Hover your mouse over each of the buttons to get a description of what they are doing.
  2. Content Area
    Where you are entering your content
  3. HTML Tag Selector
    HTML Tag Selector
    Depending on where your cursor is, this will be different.

    Deciphering the Tag Selector
    Working from the right to the left...
    I clicked on an "image" (img) that is located in a "paragraph" (p) located inside a "table cell" (td) that is located in a "table row" (tr) that is part of a "table body" (tbody) that in turn is part of a "table" (table)
     
  4. Word Counter
    This gives you a rough estimate of the number of words in your article / content
     
  5. Resize Content area.
    Just to the right of the "Word Counter" is an area that you can "Click and Drag" with your mouse to increase the visible size of the area where you edit your content.

Note:

  • The editor used a "Content Sensitive Menu" if you "Right Click" on different areas in your text.
  • Positions of the buttons as discussed below can change or even be removed and replaced by others without warning.

First Row of Buttons

General Formatting and layout functions

Template

Insert Predefined Template Content (Detailed article here)
To insert a predefined page layout in your page click this button. Anew window will open with a drop down of different templates to choose from.
The template descriptions are shown inside the template.

You will also find the template button on the "News Letter" editor

Select All

Select All
Click this to select all the content in the entire content area. Then press "Delete" on your keyboard to clear the page.

Cut

Cut (CTRL+X)
Delete selected content

Due to possible security issues this button might not work in your chosen web browser.
Use the short cut key

Copy

Copy (CTRL+C)
Copy Selected Content

Due to possible security issues this button might not work in your chosen web browser.
Use the short cut key

Paste

Paste (CTRL+V)
Paste Content

Due to possible security issues this button might not work in your chosen web browser.
Use the short cut key

Paste Plain Text

Paste in Plain Text
If you click this button before you use the paste short cut (CTRL+V), the editor will attempt to remove all the hidden attributes if you copy from an external document.

Paste From Word

Paste From Word
Click this button to open a new window where you can use the paste short cut (CTRL+V) to paste content you copied from a MS-Word document.
It will attempt to remove all the hidden attributes from the word document.

Clean Messy Code

Clean Up messy Code
If you forgot to click the "Paste in Plain Text" or "Paste from Word" buttons before you paste from an external document you can select the text you want to clean up and click this button. It will then attempt to remove all the hidden attributes that you pasted from MS-Word

Remove Formatting

Remove Formatting
Highlight the text and click this button to remove all formatting such as "Bold", "Underline", "italic" and so on.

Spell Check

Spell Check
Click this button to use your web browsers build in spell checker.
You can right-click on the words that is underlined with a red squiggly line to get suggested spellings

Undo

Undo
Click this button to "Undo" your last action in the page / article you are currently working in.
Undo will not work after you clicked the "Insert" or "Update" button.

Redo

Redo
Click this button to "Redo" your last action in the page / article you are currently working in.
Redo will not work after you clicked the "Insert" or "Update" button.

Find

Find
Use this button to search for text.
It will only search the content of the page / article you are currently working on.

Find and Replace

Find and Replace
Use this button to search for and replace text with some other text in the content you are working on.

Bold

Bold
Select you text and click this button to make your text "Bold"

Italic

Italic
Select you text and click this button to make your text "Italic"

Underline

Underline
Select you text and click this button to "Underline" your text

Strikethrough

Strikethrough
Select you text and click this button to strike a line through your text "Strikethrough"

Left Align

Align Left
Select your text and click this button to align your text to the left of the page

Align Center

Align Centre
Highlight your text and click this button to align your text to the centre of the page
 

Right Align

Align Right
Highlight your text and click this button to align your text to the right of the page

Justify

Justify
Highlight your text and click this button to justify your text across the entire width of the page

Text Colour

Select Text Colour
Highlight your text and click this button to change your text colour

Text Background

Select Background Colour
Highlight your text and click this button to change the background of the text

 Buleted List

Insert / Remove Bulleted List
Click this Button to Insert or Remove a Bulleted List

  • Item 1
  • Item 2

A feature release will have a drop down list of different bullets

 Numbered List

Insert / Remove Numbered List
Click this button to insert or Remove a Numbered List

  1. Item 1
  2. Item 2

A feature release will have a drop down with different Numbers Lists

 Decrease Indent

Decrease Indent
Click this button to decrease the indent

Paragraph 1

Paragraph 2

 Increase Indent

Increase Indent
Click this button to increase the indent

Paragraph 1

Paragraph 2

 Block Quote

Block Quote
Click this button to insert a block quote

This is a paragraph

This is a block Quote

This is another paragraph

 Text Left To Right

Direction Left to Right
Click this button to change the direction of the text to "Left to Right"
Use this only if you have content that is written in text that is normally from "Right to Left"

Left to Right

הזכות טקסט השמאל        Right to Left as in Hebrew Text  

 Text Right To Left

Direction Right to Left
Click this button to change the direction of the text from "Right to Left"
Use this if you want to enter text that needs to be read from the Right to the Left

Left to Right

הזכות טקסט השמאל     Right to Left as in Hebrew Text    

 HTML Mode

HTML
Click this button to switch to HTML Mode. This will allow you to directly edit the HTML tags and content.
For advanced users only.

Example of the above paragraph in HTML Mode

HTML
Click this button to switch to HTML Mode. This will allow you to directly edit the HTML tags and content.
For advanced users only.

 Preview Mode

Preview
Click this to preview your content as it would be in the browser.
Keep in mind it will not show the actual page. You can preview the content layout.

 Full Screen Mode

Full Screen Mode
Switch to "Full Screen Mode"

Index

First Group in Second Row

Making all the pages look the same in your website you will use the following 3 drop down menus to apply a Style, Define Headings or paragraphs, and set your Font Size.

The "Styles" and "Format" is defined in your site "Look and Feel" module and would typically be done by the person that configures your XMS Systems Installation

Styles

Styles
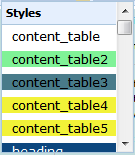
This is a drop down list of all the "Styles" you can apply to different HTML tags in your text.

Place your cursor inside the paragraph or select the HTML tag in the HTML Tag Selector, then select the "Style" from the Drop Down List.

Example
Lets apply two different style to two different tables

Create a table as described below
Set your cursor inside the table and look at the HTML Tag Selector
It might look something like the one in the image below

HTML Tag Selector

Working from the right, click the first "table" you see

Now click the "Styles" drop down and click "content_table"

Styles Drop Down

This is a table with a "content_table" style applied to it


This is a table with a "content_table2" style applied to it.

Format

Format

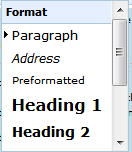
The "Format" drop down" will normally display "Paragraph" as this is the default formatting that can be applied to a bit of text.

To change a bit of text to define it as a Heading (H1) or Sub Heading (H2) or anything else, place your cursor inside the paragraph you want to format or select the HTML tag in the HTML Tag Selector then click on the Drop Down list and select the appropriate format.

Format Drop Down

Note:
You should always define Headings on your page. This helps the search engines (Google, Bing) to find the headings and sub headings on your page.


You should only define 1 of each type of heading Do not define anything in the articles as "Heading 1", XMS Systems uses the "Title / Subject" as the Heading 1 of the page

Font Size

Font Size

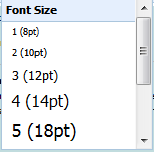
Highlight your text and select the required "Font Size" from the drop down

Font Size

Note:
All font sizes on your website are controlled by the Pre Defined "Styles" and "Formats" therefore it is not a good idea to change any font sizes on your page unless you have a very good reason to do so.

 Index

Second Row, Second Group - Table Functions

Although not the best method to use for page layouts, tables is an easy way to organise the layout of your content on a page or Article.

Insert or Edit Table

Insert / Edit Table
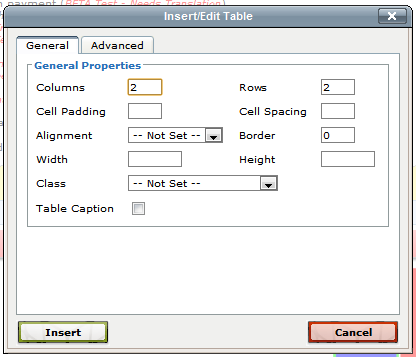
To insert a table in your text, position the cursor where you want the table to appear and click the button to open the "Insert / Edit Table" dialogue box.

To edit a table position the cursor inside the table and click the button to open the dialogue box.
Insert / Update Table dialogue box

Table Row Properties

Table Row Properties
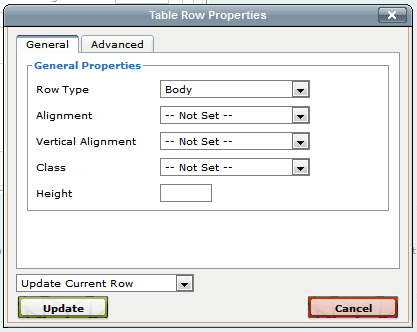
Select your table row by either locating the cursor inside the row or selecting the "tr" on the HTML Tag Selector the click the button to open the dialogue box.

This is useful if you want to define different properties for different rows.

Table Row Properties

Table Cell Properties

Table Cell Properties
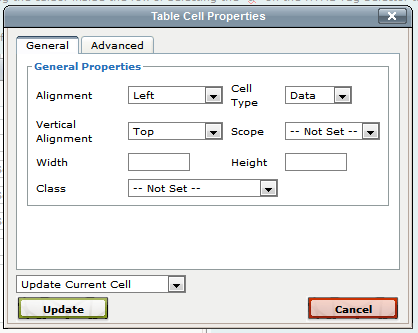
Select your table cell by either locating the cursor inside the cell or selecting the "td" on the HTML Tag Selector the click the button to open the dialogue box.

This is useful if you want to define different properties for different cells.

Table Cell Properties

Insert Table Row Before

Insert Row Before
Select your table row by either locating the cursor inside the row or selecting the "tr" on the HTML Tag Selector then click the button to insert a row before (above) the selected row

Insert Table Row After

Insert Row After
Select your table row by either locating the cursor inside the row or selecting the "tr" on the HTML Tag Selector then click the button to insert a row after (below) the selected row

Delete Table Row

Delete Row
Select your table row by either locating the cursor inside the row or selecting the "tr" on the HTML Tag Selector then click the button to delete the selected row.

Insert Table Column Before

Insert Column Before
Select any table cell by locating the cursor inside a cell then click the button to insert a column before (left of) the column where you selected the cell

Insert Column After

Insert Column After
Select any table cell by locating the cursor inside a cell then click the button to insert a column after (right of) the column where you selected the cell

Delete Column

Delete Column
Select any table cell by locating the cursor inside a cell then click the button to delete the column where you selected the cell

Split Merged Table Cells

Split Merged Table Cells
If you previously merged a number of cells into one, select the cell and click this button to split them again

Merge Table Cells

Merge Table Cells
Select any number of neighbouring cells and click this button the merge them into one cell

Show or Hide Guidelines

Show / Hide Guidelines / Invisible Content
Click this button to display or hide the guides.
Table Guides are shown by default.

 Index

Second Row, Third Group - Links

Use these to create link to other pages or Anchors inside the current page

Create Link

Insert or Edit Link
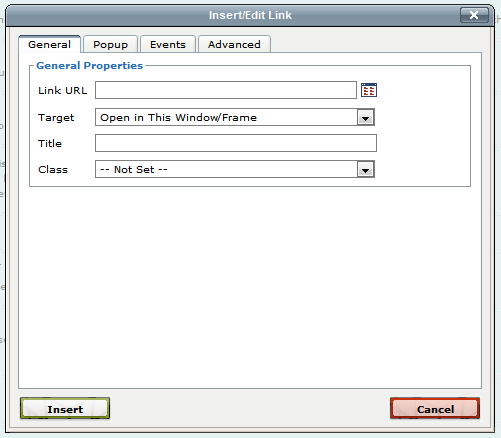
Select the text you want to use as the Anchor text (the text you want to add the link to) and click this button to open the add link dialogue box

Note:
For links to your own website you can select the target as "Open in This Window / Frame"
For links on other websites make sure to select the target as "Open in New Window (_blank)"
Make sure to enter a descriptive Title for the link


Add / Edit Link Dialogue Box

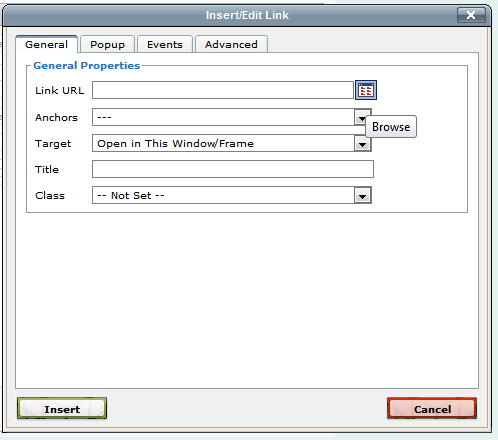
If you have any anchors defined in your text the dialogue box will look like this
You can either enter the link to the anchor in this format #Link or select the anchor from the drop down box

Links with Anchors Defined

Unlink

Unlink
Click the link you want to "Unlink" and click this button to delete the link

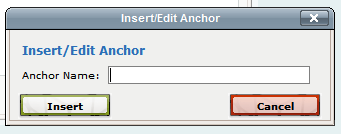
Insert / Edit Anchor

Insert or Edit Anchor
An Anchor, in this sense, is a the "top of an area" you want a link to go to on the current page or on another page.
Take this page as an example. At the top of the page I have links to the different section in this page.

To set an anchor select the text or image at the very top of the section and click the button to open the Anchor dialogue box

Enter a unique name for the anchor and write it down somewhere because you will need it to create the link to the anchor using the "insert / Edit Link" button

Anchor Dialogue Box

Once you created the anchor an anchor image will appear next to the text or image you used as an anchor to show you the location.
This image will not be visible in the published page or article.
Anchor Location

Index

Second Row - Fourth Group - Inserting Images and Media

See this article for uploading Images from your computer using the "Remote File Explorer"

Inserting Images

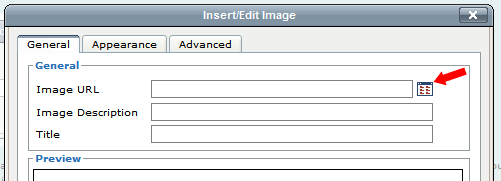
Insert / Edit Images
Place the cursor where you want to insert the image into your text and click the button to open the dialogue box
Click the "File Icon" to find the image you want to insert
Be sure to enter the Image Description and Title

Insert Images

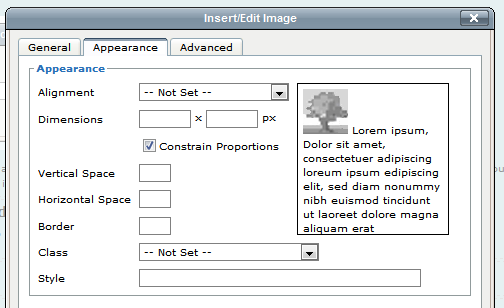
To resize and set more advance setting click the "Appearance" button
The Dimensions will be added automatically. To change the image dimensions make sure the "Constrain Properties" box is ticked then change the values as required.

See this article on how to embed images from Facebook into your pages or articles

Note:

  • Changing the dimensions will not change the actual image. So if you have a large image and only need an image the size of a postage stamp please resize your images to the required size.
  • It is considered bad practise to use large images and change the dimensions of the image on the page. It makes for unnecessary slow page downloads and waist bandwidth from your hosting account.
  • Make sure to optimise your images to reduce the actual file size as much as possible. A good website to use is Kraken Image Optimiser

Appearance Button

Inserting Media

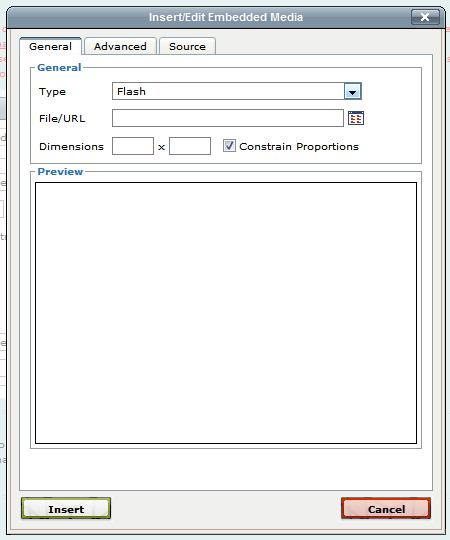
Insert / Edit Embedded Media
Place the cursor where you want to insert the media into your text and click the button to open the dialogue box
Click the "File Icon" to find the media you want to insert

See this article on how to embed video's from YouTube

Embed Media

Inserting Smilies

Emotions
Sometimes it is hard to convey emotion on the inter with written text. This is where "Emoticons" comes in handy.
Place your cursor where you want the "Emoticon" and click the image to select your "Emotiocon"

Be careful to not overdo it as it can be annoying if overused.

Note:
Do not install any Smilie or Emoticon toolbar in your web browser. They are know to contain spyware

 Index


Second Row - Fifth Group - Special Characters and Miscellaneous

Horisontal Line

Horizontal Line
Place the cursor where you want to insert the line and click the button to add a line like this


Special Charactors

Special Characters
Place the cursor where you want to insert a character that can not be typed from your keyboard then click the button to insert characters like these: ©®€

Subscript

Subscript
Select the text that you want to define as subscript and click the button

H20

Postscript

Postscript
Select the text that you want to define as postscript and click the button

22nd January

Insert Date

Date
Place the cursor where you want to enter the current date and click the button.
The date will be the current date on your computer

2012-06-12

Insert Time

Time
Place the cursor where you want to enter the current time and click the button.
The date will be the current time on your computer

19:45:52

Non Break-Space Character

Insert Non-Breaking Space Character
Use this button to enter consecutive spaces instead of the spacebar

Page Break for Printing

Insert Page Break for Printing
Place your cursor in your text where you want to force a page break when printing and click this button.
The page break will not be visible in your text.

 Index

Written by:  - Updated 4 Jun, 2016  
flashy