
Adding a Carousel to your page content
Adding a carousel to your content can make all the difference to a page. This article discusses some tips and tricks on how to do it properly including some advanced animations.
Adding a slider/carousel to your content does not have to be a major undertaking.
In this article, I am going to discuss how to do it using simple explanations and the 3 “built-in” versions. I will also discuss how to build your own custom slider and later on I will touch on some seriously advanced stuff to make any slider look like a pro done it.
This version of the “Owl Carousel” is only available in XMS Systems from version 5.2.04
How the slider works. The technical stuff...
The basic requirements are part of XMS Systems by default. All you have to do is add your content and tell the browser it is an “Owl Carousel” slider
Your code you will add will look like this:
<!-- Set up your HTML →
<div id=”default_owl” class="owl-carousel">
   <div> Your Content </div>
   <div> Your Content </div>
   <div> Your Content </div>
   <div> Your Content </div>
   <div> Your Content </div>
   <div> Your Content </div>
   <div> Your Content </div>
</div>
Replace “Your Content” with anything you want. e.g.
A paragraph will look like this:
<div> <p>My paragraph</p> </div>
An image will look like this:
<div> <img alt="Alt text" src="/uploads/media/Members/1/cart.png" style="width: 886px; height: 737px;" /> </div>
Adding navigation “dots” below your slider update the code as follows:
<div id=”default_owl” class="owl-carousel owl-theme u-center">
The “owl-theme” will add the dots. One for each slide. The “ u-center” will centre the “dots” in the centre of the page.
To use one of the “built-in” sliders replace the default_owl with loop_owl or owl_carousel_shop. The differences will be demonstrated below.
Adding your first slider.
- Edit your page and add one of the usual templates as required to make your page responsive
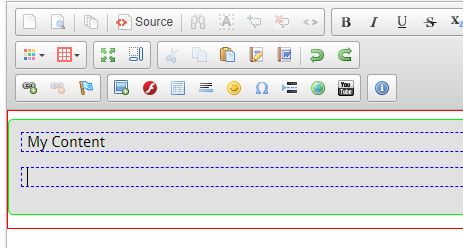
- Place your mouse cursor where you want to add the slider
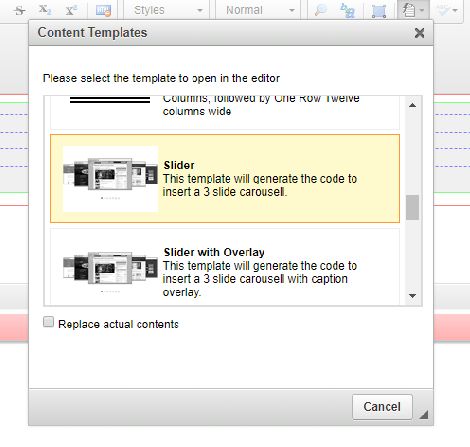
- Click the “template” button again and scroll down to the “ Slider” templates and add the “slider” template
- Your content will now look like the following
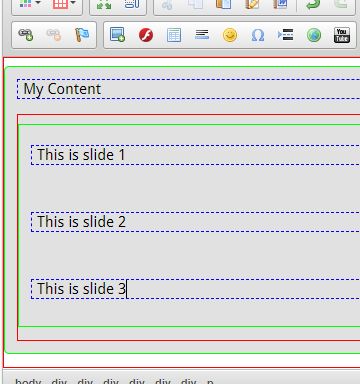
Now when we replace the paragraphs with “This is slide...” with an image we end up with the following.


This slider uses the id=”default_owl” version.
A very important point to keep in mind if you going to use an image in your slider is that each image has to be exactly the same size. If they are not the same you will end up with a slider that looks just plain ugly.
Changing the slider id
Another important point to keep in mind is that you will not be able to use the same slider twice in your content. That is, you can use each id=”xx” only once in a page.
Next, we going to change the above slider to use the id=”loop_owl”
To change the slider id, click the “source” button and find and replace id=”default_owl” with id=”loop_owl”. Scroll down and save your work. Simple as that.
Below is the “loop_owl” version.
Ideally, you would use images that are not that wide. The wider the image the smaller it will display. This type of slider would be useful to display a collection of new products on your e-commerce website. Remember you can add anything to the content and nothing is going to stop you from adding a link to the image to take a visitor to a product page.
Make your own slider.
XMS Systems has a “custom code” block where you edit your pages. You can use this block to build your own custom slider you can use on that specific page.
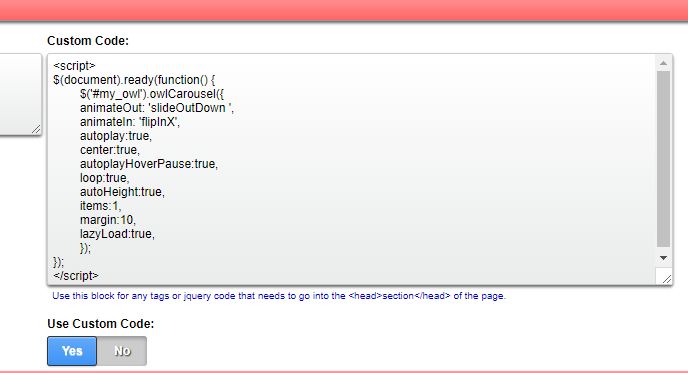
Consider the following code.
<script>
$(document).ready(function() {
    $('#my_owl').owlCarousel({ /* my_owl is my unique id=”XX_owl” */
    animateOut: 'slideOutDown', /*  Replace this as required */
    animateIn: 'flipInX', /* Replace this as required */
    autoplay:true,
    center:true,
    autoplayHoverPause:true,
    loop:true, /* start the slide again when the end is reached */
    autoHeight:true,
    items:1, /* Set this to 2 or more, to make a loop slider */
    margin:10, /* Spacing between slides if more than 1 item */
    lazyLoad:true,
    });
});
</script>
Paste that into the custom code block like below.
Add you slider as in the example above using a template and change the id=”default_owl” to id=”my_owl” and you good to go. Remember to set the “Use Custom Code” slider to “yes”
For a list of animations to use you can look at the XMS Systems CSS Cheat Sheet.
The above code is very basic and a lot more can be done with the “Owl Carousel” For more information please visit the Owl Carousel website. Remember you do not have to download anything.
Look at this demo here to see what can be done with the “Owl Carousel” if you really wanted to.