Managing a new order with XMS Systems e-commerce
How to manage a new order and client notifications with XMS Systems E-Commerce
Once you received an email notification of a new order it is important to take action as soon as possible to notify your client that you received their order and are working on getting it shipped to them.
Communication
Put yourself in the clients' position
- How soon after you placed the order would you like to get some communication about your order?
- What type of communication would you like?
- How often would you like this communication?
The way you going to communicate with your client is via emails directly from your website. This ensures consistency with the emails because all emails will be predefined and everyone taking action on an order will only have to click a button to send a relevant email.
The first step would then be to make sure your system emails are configured properly to take care of every possible scenario. Take a look at this articles on how to configure your systems emails. By default, we have one email created for you to notify the client that their order was updated. You will need to review this email template to make sure it suits your style and business.
Where to find the new orders?
Navigate to Admin > Site Dashboard > Shopping
The first tab on the page list your orders with the newest order at the top.
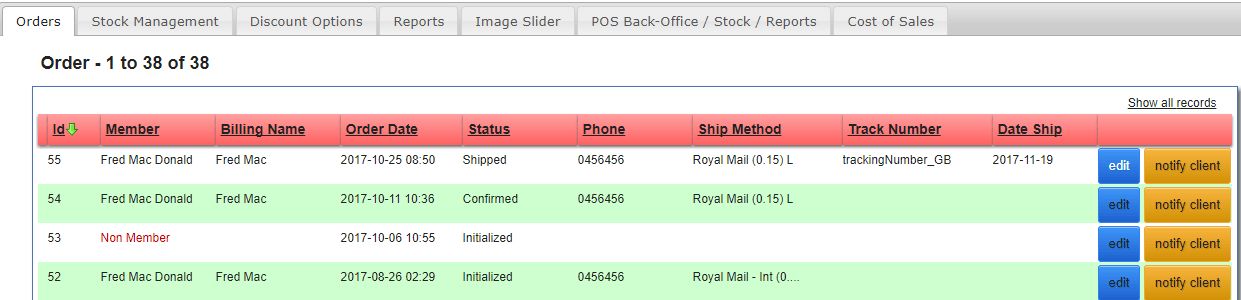
Some basic information related to the order is displayed to make it easy to deal with a specific client. You have two buttons to the right you can use to manage any order.
- edit
The edit button will allow you to take any of a number of actions on the order. - notify client
The orange button will simply send an email notification to the client. This is the default email I mentioned above. So it is important to make sure that email template covers what you would expect it to cover when you click that button.
Clicking the “edit” button will take you to the order management page. The page is split up into different section and I will discuss each separately.
Basic Order Information
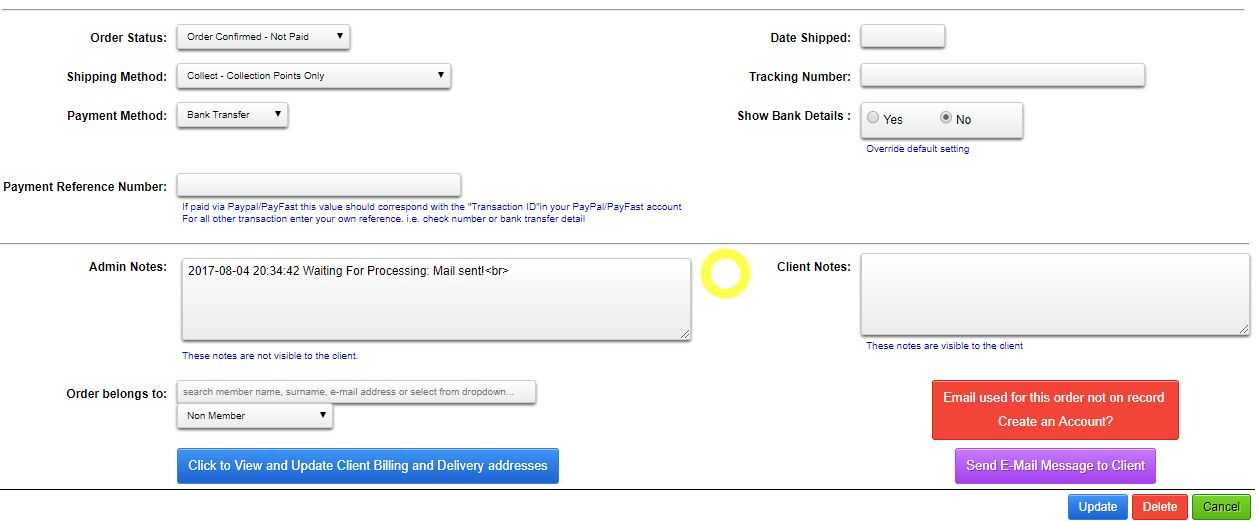
- Order Status
Depending on the status of the order, payment methods or errors during payment, there could be one of a number of statuses displayed here. If you are making use of a payment gateway like PayPal and an error is displayed first check your Paypal account to see if a payment was made successfully. It could be that your payment gateway was a bit slow or something went wrong during the reporting back to your website.
If you are happy that the payment was successful you can set the status to “Processing – Paid” and click update at the bottom followed by the “Notify Client” button. This will let the client know you have received the order and are working on getting things sorted. You can select any of the statuses available to reflect exactly what you are doing. If you need a different status, please contact us to add it to the list. - Date Shipped
When you ready to ship the order add the date here - Shipping Method
This will be the clients chosen shipment method. You can change it if needed. Keep in mind that the system will not recalculate the shipping costs. It will only serve as a notification to the client that the shipment method is different. - Tracking Number
Enter a tracking number if you have one. - Payment Method
This reflects the payment method used by the client. If a manual payment was made you can select the proper method here. - Show Bank Details
If you are supporting electronic funds transfers (EFT) and are not showing your bank details by default, you can set the option here and notify the client - Payment Reference Number
You payment gateway reference number will be displayed here. If EFT you can enter the payment reference here - Admin Notes
Initially, this is a list of notifications generated by the system to show what errors occurred during payment. There is nothing stopping you from using this block to record notes about the order if the shipping is done by someone else or just to keep a note of sorts. This will not be visible to the client. - Client Notes
This is notes that will be displayed to the client when they view the order on the website - Order Belongs to
The account this order belongs to. If this is a new client or “not registered” client the field will be blank and a red button to the right will notify your the email used is not in the system. Clicking the red button will create an account for the client and email them with their information. Make sure the email is defined as above. - Click to view and update Client Billing and Delivery address
This will display the client billing and delivery information and allow you to update as required. - Send E-Mail Message to client
This will allow you to send a “custom” email to the client if, for example, you need to confirm something specific about the order.
Creating an account for your client
Click the red button to create an account will ask you to confirm the email address used is correct and valid. Granted you cannot be 100% sure the email address is valid but if it looks strange, try to ring the client or contact them is some other way.
Remember if you made any changes to the basic order details and or delivery/billing info make sure to save your work before you try to create an account. You will get a warning about this to make sure you did.
Review the information in the form is correct and click the “Create Account” button to create the account and send the new account information to the client.
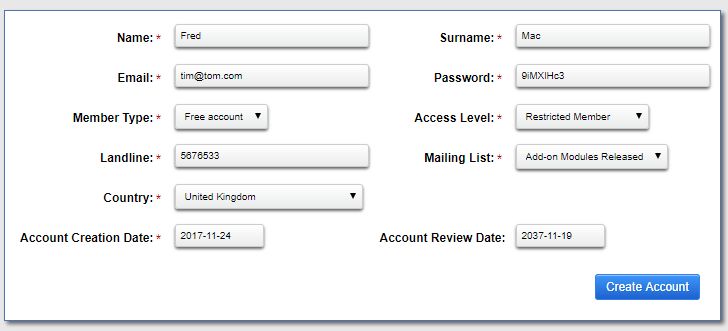
When the account is successfully created you will be taken back to the order page where you can allocate the order the correct account. Start typing in the field and select the correct account from the dropdown list followed by the “Update” button bottom right.

Custom order related emails
This is a collection of emails created by you that can be used to send specific emails to a client. The emails are highly customisable and personalizable. See article on system emails here.
Stock Management
If you are using stock management, picking your stock is an integral part of the order processing process and you have an “Order Status” for that above.
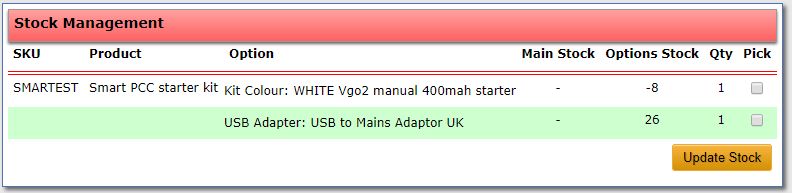
This part of the order page will show you your physical stock. (In this case, we do not track the “main stock” because the stock levels are “limited” by the “colour” of the item options.). To “pick” the stock, tick the box and click “Update Stock”.
Depending on your e-commerce configuration the adjusted stock levels will be displayed on the relevant product pages on your website.
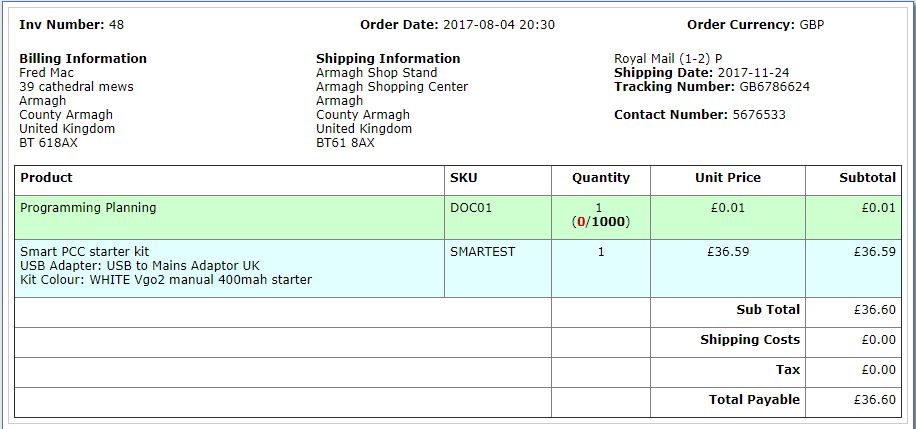
Detailed order information as the client will see it.
The following is the last bit of the order update page and give a complete overview of the order.