
Managing XMS Systems translation file
How to manage the actual translated words and update them to suit your specific needs.
If you just imported the latest words, created a new language file or want to modify some of the words to better suit your website click the “manage translation” button next to your chosen language.
If the chosen language is different from your browser default language you might get a pop-up asking you if you want google to translate the page for you. Obviously you do not want that so you can safely decline the offer.
You will see something similar to the following.
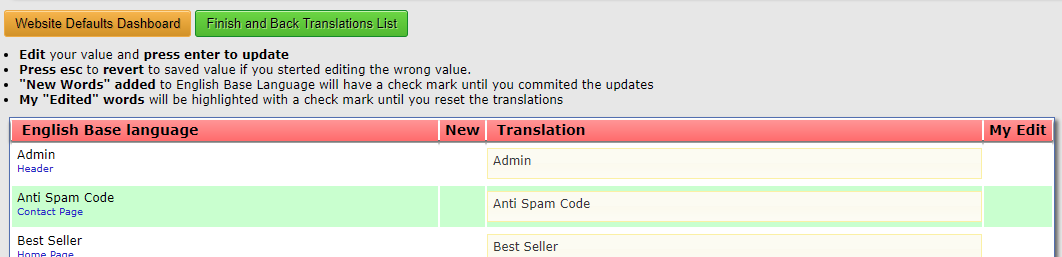
- English Base Language
This is the original words/sentences as used on the website.
The small blue text gives an indication of where you will/might find the text. Some of the words are used in more than one place however the contect will be the same. - New
To identify any “new” words that you imported into the translation, a green check mark will be displayed next to the new word

- Translation
This is the actual words/sentences that will be used on the website if this language file is selected as active under your default website configuration - My Edit
If you changed a word/sentence a green checkmark will be displayed in this box next to the word you changed.
Changing a word/sentence

- click on the word/sentence you want to change to turn the field green and highlight the word as above.
- You can then type in the new word and press enter to update the database on your website.
- Changes are saved immediately and can not be undone. A green checkmark will be displayed if the update was saved sucessfully

- If you clicked the wrong word you can press ESC to exit back out the field
- Once you done making all the changes you can click the green “Finish and Back to translation list” button
This will take you back to the list of different language files where you can click the “commit new translation” button to generate the actual translations file the website will use.
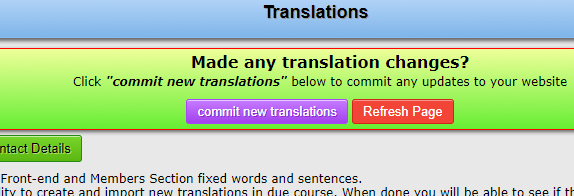
Once the translation file has been successfully created and you refreshed this page, the number of “new words” will be rest to “0” as an indication the procedure was successful.
Making more changes
Once again click the “Manage Translation” button next to your chosen language. You will now see the checkmark in the “My Edit” field next to your own translated/updated words.

Repeat the steps above to update more words until you happy with the translation. Remember to check your website with the new words in place. Take the time to check the layout on a mobile device as well to ensure your new words/sentences are not to long and messes with the layout of the page.