
Define the Exam parameters to be used to generate the exam
How to define the parameters to be used as the basis for generating the exam by the dynamic exam generator.
Managing Exams definitions
Before you can present any exams or tests you need to set some basic information for the exam.
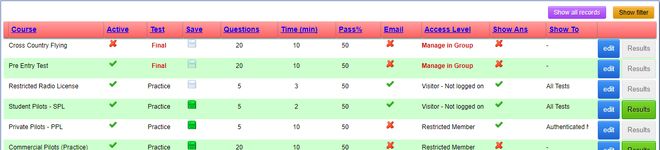
- Course
The name of the course this exam belongs to - Active
If this exam is active or not. This means you can have two or more exams defines per course and make different ones available at any time. - Test
Is this a practice test of final exam - Save
If “green” the results of the exams will be saved for logged in users - Questions
Number of randomly chosen questions used for this exam - Time (min)
Time allowed to complete this exam in minutes - Pass%
Minimum percentage required to pass this exam successfully (providing the answers is submitted within the allotted time) - Email
If email address is required for not logged in users to access this exam - Access Level
Minimum access level the student/member needs to have to be able to take this exam. This would limit the test to registered members only. In the case of Final Exams, the access is controlled by adding members to the course. - Show Ans
Whether the correct answers should be shown to the student after the answers has been scored - Show To
If answers should be shown, who can see them? - edit
click this button to edit the exam configuration - Results
Click this “green” button to see the results. If this button is “grey” it means no one has attempted the exam yet. - add new
Click add new at the bottom of the page to define a new exam
Adding or Updating an exam
Click “add new” or “edit” to add or update a new or existing exam.
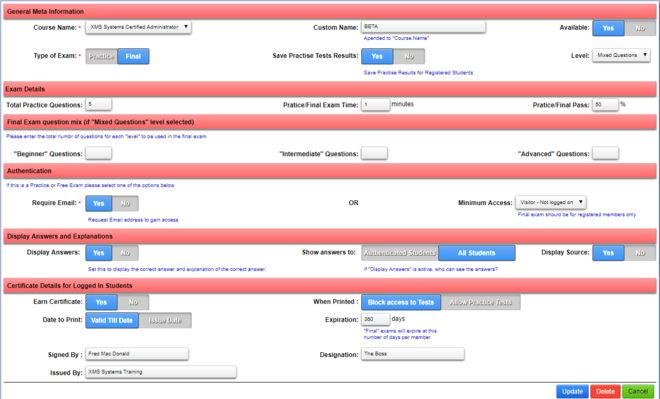
General Settings
- Course Name
Select the course name from the drop down - Custom Name
If you have different “classes” for this exam add a custom name to allow you to differentiate between them. The exam name will then be displayed like this: “Course Name – Custom Name” in all instances. Be careful to not make the names too long to avoid issues when printing the certificate. - Available
Is this exam available in the “Index” or not - Type of Exam
Set the type of exam. Final exams will not be shown in the “Index” but only be visible to registered students that are enrolled in the course. This will be available in the “Members Area” if the member is enrolled as a student to a specific course and the course is set to available. - Save Practise Test Results
If this option is set to “Yes”, the results will be saved for logged in users. The actual answers per exam will also be available to administrators for review. - Level
Set the difficulty level of this exam- If you do not select any level here, the test generator will randomly any question that belongs to the selected course name.
- Selecting “Mixed Questions”, you need to enter the “mix” under the “Final Exam question mix”.
If you do not define the “mix” values, a selection of random questions will be used anyway. - Any of the other levels will cause the exam generator to randomly select questions from that level only. If you select a level that has no questions categorised as belonging to that level, the exam could be empty or displaying less questions that are necessary to pass the exam.
Exam Details
- Total Practical/Final Questions
Set the number of question to select randomly from your question database to be used for this exam. If you selected “Mixed Questions” as the level, make sure to enter the values in the next section. - Practice/Final Exam Time
Set the total time allowed for the student to complete this exam. - Practice/Final Pass
Set the pass mark for this exam as a percentage %
Final Exam question mix
Enter the number of questions from each level you would like to randomly add to the mix when the exam generator generates the final exam.
Authentication
Authentication is used to make sure the site visitor has proper credentials to access the selected exam. Selecting the following you have three options per exam. (Excluding final exams)
- Require Email
Set this to “Yes” if you want the visitor to submit their email address before they can gain access to the exam OR - Minimum Access
Set the minimum access required to gain access to the exam. If you select access set to “Visitors – Not Logged on”. This means anyone will have access without you knowing who is taking the test - Minimum Access
Set anything above “Visitors” and only members with that specific access level will be able to take the test.
1. If you set Required Email to “No” and leave the minimum access set to “Visitors”, the exam will be marked as a “Free Exam” and available to all visitors, authenticated or not.
2. Email authenticated visitors will have their email address added to your “Newsletter subscribers list”
3. Final Exams should not be authenticated by E-Mail. You will set a minimum access level only
Display Answers and Explanations
- Display Answers
On completion of the exam and the results are presented to the student do you want to show them the correct answers with explanations for the questions they had wrong? - Show answers to
To who you want to display the correct answers?- Authenticated students means only those that have submitted their emails or are logged in will be able to see the correct answers
- All Students means everyone will see the correct answers
- Display Source
Setting this to “Yes” will display the source as part of the answer
Certificate Details for Logged in Students
- Earn Certificate
Set this to “Yes” if the student can print a certificate on successful completion of the exam. This is only available to registered users. - When Printed
What needs to happen “after” the certificate has been printed?- Block access will display a notice to the user and block them from accessing the exam again
- Allow Tests will display a note to the user that they have completed the exam and allow them to continue practice
- Date to Print
You have the option to print the “Issue Date” or “Valid till Date”. The “Valid Till Date” option will take today's date and add the number defined in the “Expiration” days field - Expiration
This defines how long the certificate earned will be valid for. After this number of days, the exam will be available to the student to retake. - Signed By
A certificate needs to be signed by someone... - Designation
The person signing the certificate should have a designation... - Issued By
This would be the issuing authority
The certificate is uploaded as a “blank” and the appropriate information printed on the pre-defined positions. This includes the “score” achieved as well. The actual certificate is printed as an A4 size.
In a feature release, we will most probably add the option for you to upload your own certificate with the ability to define where what information needs to be printed.
Example of a certificate generated by XMS Systems
