
adding an image slider with caption overlay to XMS Systems content
This tutorial discusses the process involved to add an image slider to your content. It touches on folder creation, image upload and code editing.
Adding an image slider to your content dramatically enhance a page and allows you to display more content on a limited space on your page. It is important to remember that images will take longer to download and use more of your visitors precious bandwidth so use it wisely.
Note: The image slider is only available as a template for your “Page Content”. This is to prevent your registered members that have access to post articles from messing up your website. If you need this in any of your other modules, please drop us a note asking to add it to your “custom templates”
Adding an image slider.
- Navigate to the page you want to add the slider into.
- Click the position where you want to add the slider
- Click the “template” icon
- Select the appropriate slider to populate your page with default slider content.
- Click each image in the slider to replace the image as you would usually add/replace an image in your content. making sure to update the “alt text” field with the correct information.
- Switch over to “Source” to edit the caption.
- Find the text between the < h5 >Slide 1< /h5 > tags an carefully replace it with your own caption.
- Click update at the bottom of the page and check the page displays properly.
The code for the slider looks like to image below
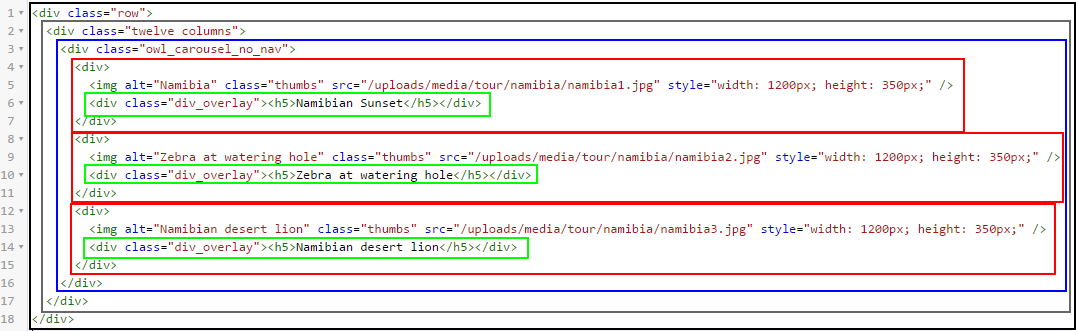
In detail the code does the following. (the coloured blocks does not show in your editor and are added to the image to assist with identifying the different sections.)
- Black block and grey blocks
This is usual code to force the page layout and the width of the slider in columns - Blue Block
This is the actual slider with the images to slide inside it in the red blocks - Red Blocks
For each image in your slider you will have one of these red blocks. - Green Blocks
This is the overlay for displaying the image caption.
Adding more image to the slide
By default the template will add three slides. You can easily add more slider by carefully copy and past one of the red blocks making sure to start at the < div > and end at the last < /div > making sure you have the image and overlay bits included.
Changing the way the slider looks
By default the slider display “dots” below the slider to give the visitor visual indicators what slide they are viewing.. You can change this by changing to the “source” view and replace the the class < div class=”owl_carousel_no_nav” > with one of the following, making sure your have the exact spelling.
- owl_carousel_only
This will display only the images - owl_carousel_no_nav
This will display the dots below the slider - owl_carousel_no_dots
This will display “prev” and “next” navigation buttons below the slider - owl_carousel
This will display the dots as well as the navigation buttons below the slider.
Tip
To display a good looking slider you need to get your image dimensions the same for all the image in the slider. Image with different dimensions (height and width) will cause blank spaces and most probably interfere with other images.
If you do not want to use the overlay simple delete everything to do with the overlay.
< div class=”div_overlay” >< h5 >Image 1< /h5 >< /div >